Unfortunately, it seems my Riverwalk Left 4 Dead campaign has some troubles.
I did some playtests that resembled the kind of layout/design I wanted to give my Left 4 Dead campaign which would be heavily based on the Riverwalk. To be honest, it didn't work out. The long river makes it incredibly easy to avoid Zombies and many of the areas were "fish in a barrel" moments which is kind of fun but stops being fun when survivors quickly realize theres nothing to be afraid of. To make matters worse, optimizing the Riverwalk test maps were a complete hassle due to the long visibility of having such a long gap. The water slowing survivors sounds like a neat element but overall, most players hate this mechanic. Think about it. The least favorite campaign is Swamp Fever in Left 4 Dead 2. Long story short, I decided to quit the campaign idea.
Of course though, that doesn't mean I'm not going to be working on a Left 4 Dead campaign. Much like a phoenix, this canned project brings life to a new project which I hope will address the main lesson I learned from my previous project. Specifically, I want to focus on gameplay more. The whole Riverwalk idea was cool in my head, but wasn't exactly fun. Because of this I want to focus on designing levels/layouts that are actually:
A. Fun
B. Awesome
If I can achieve this with the layouts, I can work on the aesthetics of the map without worrying about if it clashes with the main gameplay elements of Left 4 Dead. So I'll be posting more information as I work on my Left 4 Dead campaign project and hopefully I can get work done on it much more efficiently.
Tuesday, September 14, 2010
Sunday, July 4, 2010
HELLO!? ANYONE OUT THERE!?
So I realized I haven't updated this blog like in ever. But I have a good reason for that. The Team Fortress 2 Polycount Pack contest! I worked on and submitted entries for it. But in order to have done that I had to put my Left 4 Dead stuff on hold.
Good news is that the contest is now over and I can start back up working on my Left 4 Dead campaign! Even better news is that I'm getting a tablet so I can be even more artsy in developing the campaign.
If you're curious about the Polycount Team Fortress 2 Contest, you can check out my WIP thread here along with my entries here: http://www.polycount.com/forum/showthread.php?t=73108
Be sure to check out all the other awesome entries aswell!
I'll more than likely be posting later about the process of designing those weapons.
I'll more than likely be posting later about the process of designing those weapons.
Tuesday, April 27, 2010
Distraction fueled filler Concept Art
I haven't updated this blog mainly since I have had some distractions in my life. The more responsible reason would be school. I'm going to be having finals soon and likewise my classes are starting to spam work out more rapidly, leaving me with less mapping time. In the more irresponsible light, I got indie game Beat Hazard and it sucked up a huge chunk of free time from me because of how fun it is. I highly recommend picking it up. The Passing was also released (which I loved in both a player's standpoint and studying it's level design). I'll probably put up a post about The Passing later on.
As for the campaign/map itself, even though I haven't been able to work on it fully, I still drew concepts for it to help brainstorm some ideas. Here's some of those sketches:
Click for Huge-O version:

Saturday, April 17, 2010
Size References and Dev Textures
The worst possible thing to happen to any mapper is to map out a large part of your map only to realize that it's over expansive or too small. This is where size references come to great use.
For starters, I highly recommend staying on Hammer's grid. You can use the "[" and "]" to change your grid size. Staying on the grid pretty much reduces the amount of errors you may receive and the Hammer Editor compiler will love you too. Along with reducing errors, it makes your mapping much more neat and precise.

"That's not on Grid!"
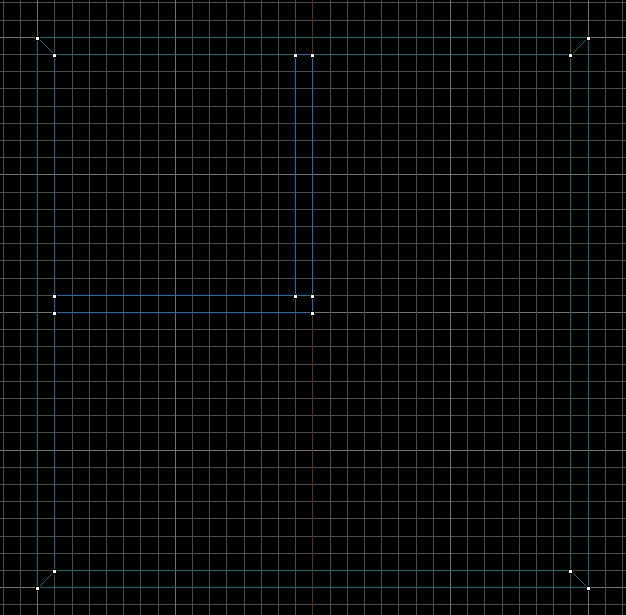
"Oh! Okay!"
As for size references, I created a reference vmf where I'll be storing various references for my map. Be it styles, size references, dev textures etc.
I placed some prop_static of various Left 4 Dead characters. This gives me a good idea of size reference of a area. Likewise, you can use the spawn point entities for the same purpose.

"Size Reference Group Photo"

Here's another good size reference. Cars. We all have some sort of grasp how cars measure in real life, that way we can use this method to make better judgments of measurements in our map compared to reality. Likewise, in this method, survivors can be placed to make even finer measurements within the cars. Nick represents every car mark, and Ellis represents every halfway/inbetween car mark.


"This fits with that "On the Grid" thing mentioned earlier"
Dev textures are a good size reference aswell. If you've randomly joined a custom map server in any source game, you have no doubt come across a dev texture map. The good thing about the Left 4 Dead 2 Authoring Tools is that they have changed the dev textures to something more eye pleasing.

"Old Method: OH WHAT THE- MY EYES"

"Ah, much better"
 As you can see, they're different shades of grey, rather than blinding orange. The shades of grey represent different reflectivity in regards to radiosity. Remember that the source engine is capable of radiosity. Radiosity is allowing the color and light of a texture to bounce off due to lighting. If you have a green wall, when light hits it, it'll reflect green back to it's surrounding environment. You can use these dev textures to represent various shades of textures you might use later on to take advantage of radiosity. For example, if you want a bright plaster wall, you may want to use a dev texture with higher reflectivity while for a darker gravel road you might want to use a darker reflectivity amount.
The wall dev textures, when using the default scaling (0.25 by 0.25) represent a good height of one story.

"2 Story Building, looks about right"
Keep in mind that this is just a general measurement, you have to take in account actual architecture for your measurements. For example, Southern architecture have higher ceilings because of the heat. You can see this represented well in Left 4 Dead 2. In cases like this, you may want to create "half-sized" dev Textured walls to help create additional halfway marks or whatever measurement you want to add. Think of the default 0.25x0.25 dev texture wall as one unit. Just multiply or divide 0.25 by what measurement you want.

Here you can see my half-sized dev texture walls combined with the normal default sized dev textured walls. The half-sized dev textures are scaled by 0.125x0.125, or when simplified 0.13x0.13. (0.125 was made by dividing 0.25 into half.).
Hope this was useful to any mappers out there. If you have any other useful advice/tips you'd like to share feel free to email them to me and I'll include them in a post with your credit.
My next blog post will cover blocking out the first map. Til then.
Friday, April 16, 2010
La Villita Stage One: Design
The first stage of mapping for me starts off in the design phase. This is the phase where I sketch out a bunch of layouts and design concepts in order to allow my head to brain storm. I usually go through enough sheets of paper to run a mini rain forest until I have a layout that I think will work.

"Paper cuts, imminent"
I didn't always do this, I would just randomly go into Hammer and throw stuff together and allow that to be my brainstorming, but that would often lead to frustration and alot of unused maps. When I worked on my Senior Project map (which was a source engine based replica of my school) I found that frustration and confusion decreased dramatically when I had a already planned out layout that I could add to and alter.
Considering how heavy level design is actually needed in Left 4 Dead maps, I decided to scrap the technique of randomly playing with stuff in hammer and actually work on sketching out layouts. It turned out to be alot more productive and fun and is probably going to make the mapping far more enjoyable.
Anyways, after I'm done irritating Captain Planet from the amount of notebook paper I used, I transfer the designs and layouts I did on the sheets of paper to this goliath thing:

"A notepad for a king, or a earth giant"

You see, the problem with notebook paper is that it's relatively small. It's made to carry notes, homework, and stupid letters to friends. Blueprints get kind of gimped when put on notebook paper due to the size that most blueprints usually demand. Usually you'll have to rely on multiple sheets of paper and just kind of put them together like a Dungeons and Dragons game board map or something in order to plan map layouts and blueprints on them. Rather than having to do all of that, I decided just to use this huge sized notepad to allow me to transfer all of my layouts from notebook paper to a scale that the layout can actually fit in.
Because of the epic size of this notepad, it should also have a higher quality blueprint. So I try (emphasis on try)to use my ruler to create straighter lines. But sometimes I just suck at straight lines.

"As you can see from the rest of the lines, I'm pro at straight lines. Seriously."
While at a workdesk designing your map's layout, it's usually a good idea to have a Personal Media Player with you to play music and/or podcasts, because you aren't just gonna listen to silence while you layout some plans.

"Beware the Giant Zune Riverboat of Death!"
It's important to note that, just because you "finalized" your map layout on the notebook sheet paper doesn't mean you can't make changes. As you might soon realize, you might get sudden epiphanies and sparks of brilliance, either thanks to you or Coheed and Cambria, so you should make changes accordingly.

"4 Cans of Dr.Pepper optional."
As you may have noticed in the photos, I planned my layout from a top view perspective. While this is good enough, the best method is Isometric designs. But you see, I suck at Isometric designs. Why are isometric layouts better? Well, they are able to capture height variation much more accurately and makes it less confusing. There is a way though to overcome this if you're creating a layout from a top view perspective. Just have platforms or whatever that are at a higher elevation to have thicker lines and lower elevation plaforms have thinner lines. It seems to work just as good.
Once you got your layout down it's time to go to the blocking stage. More on that later. Likewise, I'll probably make a post about the decisions that went into the design of the layout. Stay tuned.
Tuesday, March 23, 2010
All You Need is Ubers

I've been doing a couple of concepts lately for weapon and hat ideas for Team Fortress 2. One of my ideas entertained me the instant I thought it up. The Medical Mop Top, which would give the Medic a John Lennon-ish look with a time appropriate mop top hairstyle. I did a couple of sketches and ended up creating a simple concept in about 10 minutes. I planned to work on the mop top later on and I wanted to amuse some people on various message boards with my idea.
Most people liked the idea, but one Facepunch Studios forum goer by the name of Donksuli liked it so much he decided to model it before I could even start. This is a good thing however, because he did a fantastic job. I mean, look at that! If that's not fab I don't know what is. Here's my original quick concept piece that I did:

To make such a awesome hat from that is totally fab. He's submitted in to the contribution site and is giving me credit for the concept design, so if it gets accepted, we'll both will be Day Trippin'.
Be sure to check out the other stuff he made and submitted in:
Be sure to check out the other stuff he made and submitted in:
Beholdeth! The Command Shell!

This is my first Team Fortress 2 hat. Based off the assumption that all good engineers know of the traditional cultural tradition of turtling. This is not to be confused with actual turtling defenses, turtling is the respect for all shelled creatures and to ensure they don't go extinct. Even if this means wearing what appears to be their remains on top of your head like some sort of mad man. The actual turtle defense thing is quite the coincidence.

I submitted to the Valve contribution page along with posting it up as a model replacement for the "Ghastly Gibus" hat on FPSBanana, because honestly, a turtle shell hat beats a spooky old ghost hat.

Subscribe to:
Posts (Atom)